So there are actually a few websites out there that describe different ways to attach a crate to the back of your bike (D may not have needed to research, but I did). The approaches I found (via Google), and why I rejected them:
- Zip tie system - seems like the crate would be very secure, but not really a removable/re-attachable, my #1 criterion
- Bungee sytem - in theory removable/re-attachable, but seems like a pain if you're not well practiced in bungee-ing things down; also, concerns that it's not as secure, and bungee may snap
- Two metal plates, nuts and bolts - didn't actually see this until I started researching this post, and it's closest to D's system, but it's not removable/re-attachable
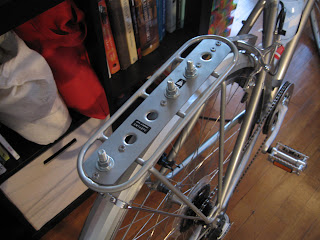
Now, D figured that I should be able to take my crate on and off the bike without having to use any tools, and that the final product should be pretty secure. He came up with a system in which we attached bolts permanently to the bike rack (see order listed in picture caption). We were really lucky in that my bike came with a rack that had an aluminum plate attached, which had pre-drilled holes. The rack worked out really well for our system--D said it seemed like the rack was made to have a crate attached to it!
 |
| Bolts, flat washers, slit lock washers, hex nuts, and threadlocker |
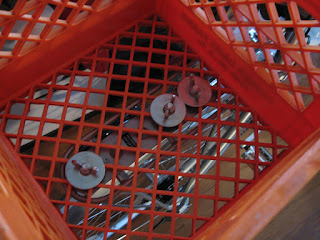
To attach the crate, you center the crate on the rack with the bolts threading through the holes in the bottom. Then you put a fender washer onto each bolt, and secure the washer with a wing nut.
 |
| Fender washers and wing nuts |
And there you have it! To remove it, you just undo the wing nuts and take the washers out.
 |
| Attached crate |
The crate is actually pretty secure with the washers and wing nuts alone, especially since we put three bolts in place. However, it still rattled around a little when I went for a ride, and I wanted just a little more security, so I also bungee it down. There's no complicated looping; the cords come in packs of two, so I just run one cord through the front of the crate, and the other cord through the back; the cords hook directly to the rack by the rear hub.
 |
| Optional but recommended: bungee cords |
The bungee cords add some time to the attaching and removing process, but on the whole it's a quick and easy couple of minutes. I've ridden my bike through some bumpy roads, and it's very stable. I think it's a pretty nifty system, though admittedly having a rack like mine helps a lot. =)
Edited to add: Here's a diagram of the different components of the attachment system, BUT I forgot to draw in a flat washer that goes between the rack and the bolt. Oops...
| Drawn in Paper by Fifty Three, my favorite drawing app ever |

This is actually what I was looking for. Just like you, I had to look online, unlike D. Thank you for posting this and putting a drawing.
ReplyDeleteYou're very welcome!! I hope the system worked out well for you, and that the explanation/diagram made sense!
Delete