Monday, August 6, 2012

DIY bicycle skirt guard!

While watching the Olympics, I've been working out how to make a skirt guard for my bike. I like to ride around in normal clothes including skirts and dresses, and as with many before me, the hem would get caught in the spokes or the brakes or between the tires and fenders. So, I started poking around the internet and there are apparently many versions of these! There was even one on Etsy I really liked, but I didn't want to pay that much for it (I'm sure it's well made and worth it, but still...).

So, after carefully examining the ones online that I liked best (as carefully as you can with tiny pictures anyway), I figured I would try to make one myself. It took some trial and error to get the proportions right, but the end result:
 
DIY bicycle skirt guard
Right side: skirt guard has to go above chain
DIY bicycle skirt guard
 Left side: skirt guard has to go around lock bracket

Here are the components of the skirt guard (per side):
  • Mason line - also know as Seine twine? It's really hard to search Mason line on the internet without coming up with a lot of sites on the Mason-Dixon line, but mason line is readily available at Home Depot and comes in bright colors; the main advantage of this material is that it's supposed to be weather resistant: the brand I got claims to be "rot proof" and to resist oil, gas, and most chemicals; another brand I considered claims to be resistant to mildew, moisture, and dryness
  • 1 split ring - I know it as a keyring, D gave me the technical name
  • 1 Velcro wrap - D's idea, it's perfect!
  • 15 micro binder clips - if you're like me and you don't want to drill holes in your fenders, this works, though you might need a lip on your fender so that the clip stays in place
  • Super glue - to secure the knots
So I might do a more detailed write-up later, but having gone through this once, I think I could do better next time. Not that I'm unhappy with the result, but perhaps I would want to try different techniques (different knots? crocheted?) and different materials (reflective cord?). For now, it serves its function of protecting my skirt, and I think it looks pretty cute in DIY kind of way.

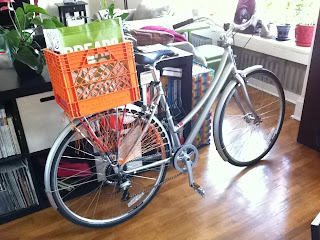
bicycle skirt guard, milk crate on globe daily 2
Orange is a readily available DIY color

Bicycling in recent media

Whoops, I accidentally deleted my original post on recent bicycling media items...

Anyway, this blog isn't supposed to limited to riding my bike, but that's naturally received a lot of my attention lately. I haven't read all of these to completion, but they definitely touch on specific topics that I am interested in, so maybe I'll comment on them thematically at a later date:


My friend P (who sent me the WNYC link) also recently found a contest run by the Paris Review in which you could win a bike if you could describe what's happening in the picture below, 1) in 100 words or less, and 2) in the style of Elizabeth Bishop, Ray Bradbury, Joan Didion, Ernest Hemingway, or P. G. Wodehouse. I happen to love some of Joan Didion's essays, but alas! I missed the deadline.
Notice the skirt guard and chain guard; this bike is not American

Sunday, July 15, 2012

Cargo options for my bike!

Over the past few weeks, I've done a lot of research on different ways to carry things on my bike. The most obvious thing would be to just carry everything in a back pack, but I don't like having a bag on my back throwing off my balance, particularly when going to work involves a big hill with a narrow, bumpy road and a sharp-ish turn in it. Also, it makes my back sweaty. So, I've turned to other means:

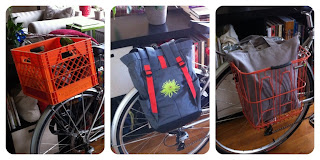
milk crate, detours ballard pannier, basil bottle basket
Milk crate, pannier, bottle basket


Milk Crate
I've found the crate is a good general purpose mode of transporting things. It's very secure, and can carry a lot--more than any of my other options, actually. In addition, I don't have to worry about leaving the crate on the bike, whereas I'd have to carry the other options with me wherever I went. The main disadvantage is that because of where it's positioned, putting too many heavy things changes the center of gravity of the bike. So, my primary use for it has been for running quick errands. I can throw a purse and a sweater in there and go to the market to pick up a couple of odds and ends. It gets a bag of vegetables or a box of pastries home very nicely.

Pannier
I got this bag mainly so that I could carry my laptop and papers into work. I found that putting these things in my regular backpack in my crate made my bike more likely to "take off" (it's heavy high in the back, so the front wheels tend to lift off the ground a little). This bag is just big enough to hold my work things, and even gym clothes if I plan appropriately. It has a rubber bottom and a rain cover, to keep things dry in various conditions. An added handy feature is that the straps convert to back pack style. It's actually so compact, and I can hardly feel it on the bike even with my laptop and clothes in it--sometimes I look back just to see if it's still there!

Bottle Basket
Perhaps the least necessary of my cargo options, the ideal use for this basket is carrying tall, heavy things that I wouldn't feel comfortable transporting in my crate, e.g. cartons of milk or juice, other things that throw off my balance. I suppose I could carry some of these in my pannier, but this basket feels more secure: it has two arms that hook on to the rear rack, and I use a bungee as well since I travel some very bumpy roads. It's less fussy to get on and off, as there's no messing with clips and tucking away straps and flaps. It's also roomier than the pannier, which can't really take a full load of groceries. Of course, the real added value of this bottle basket is that I can hang it on one side of my rack while hanging my pannier on the other. So, if I wanted to load up on heavy and tall items as well as a regular load of groceries, I wouldn't be limited to choosing either my crate or my pannier.

One thing that might limit me is the 10kg max load on my rack; otherwise, I might attempt this:

Something I'd never actually do

Saturday, July 14, 2012

How to attach a milk crate to your bike (nuts/bolts/washers method)

I cannot claim any credit for this, since my only role was insisting on having a system such that my crate is easily removable. The whole thing was engineered by D, who figured it out without even looking anything up--his do-it-yourself skills never cease to amaze me. I also found that if you wheel your bike into Lowe's and park it in the hardware aisle, nobody bats an eyelash.

So there are actually a few websites out there that describe different ways to attach a crate to the back of your bike (D may not have needed to research, but I did). The approaches I found (via Google), and why I rejected them:
  1. Zip tie system - seems like the crate would be very secure, but not really a removable/re-attachable, my #1 criterion
  2. Bungee sytem - in theory removable/re-attachable, but seems like a pain if you're not well practiced in bungee-ing things down; also, concerns that it's not as secure, and bungee may snap
  3. Two metal plates, nuts and bolts - didn't actually see this until I started researching this post, and it's closest to D's system, but it's not removable/re-attachable 
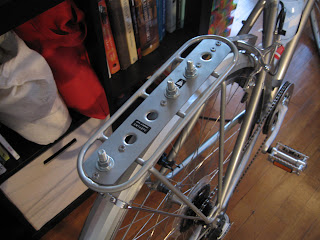
Now, D figured that I should be able to take my crate on and off the bike without having to use any tools, and that the final product should be pretty secure. He came up with a system in which we attached bolts permanently to the bike rack (see order listed in picture caption). We were really lucky in that my bike came with a rack that had an aluminum plate attached, which had pre-drilled holes. The rack worked out really well for our system--D said it seemed like the rack was made to have a crate attached to it!

bolts for milk crate on globe daily 2 rack
Bolts, flat washers, slit lock washers, hex nuts, and threadlocker

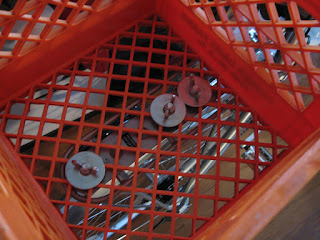
To attach the crate, you center the crate on the rack with the bolts threading through the holes in the bottom. Then you put a fender washer onto each bolt, and secure the washer with a wing nut. 

fenders and washers to attach milk crate to rack
Fender washers and wing nuts

And there you have it! To remove it, you just undo the wing nuts and take the washers out. 

milk crate on specialized globe daily 2
Attached crate

The crate is actually pretty secure with the washers and wing nuts alone, especially since we put three bolts in place. However, it still rattled around a little when I went for a ride, and I wanted just a little more security, so I also bungee it down. There's no complicated looping; the cords come in packs of two, so I just run one cord through the front of the crate, and the other cord through the back; the cords hook directly to the rack by the rear hub.

milk crate on specialized globe daily 2
Optional but recommended: bungee cords

The bungee cords add some time to the attaching and removing process, but on the whole it's a quick and easy couple of minutes. I've ridden my bike through some bumpy roads, and it's very stable. I think it's a pretty nifty system, though admittedly having a rack like mine helps a lot. =)

Edited to add: Here's a diagram of the different components of the attachment system, BUT I forgot to draw in  a flat washer that goes between the rack and the bolt. Oops...

bolts, washers, nuts to attch milk crate to bike
Drawn in Paper by Fifty Three, my favorite drawing app ever